SEARCH this blog

Friday, January 25, 2013

Project 15: Valentine's Day Bunting

The kitchen is a mess, and the baby is falling asleep at her meal, but see the pretty bunting hanging above her?


Here is how you make one: 


**NEXT STEP**
No photo, take each the 2 TRIANGLES that you cut, turn them so the pretty sides face each other.
PIN so they don't move around.
SEW ALONG sides of triangle, leaving top of triangle open.
FLIP INSIDE OUT, so that pretty side is showing.
IRON FLAT


Yay!! You are now done. Hang up wherever you want!

This tutorial helped me a lot, but there is a little measurement confusion at one point. (To clear up, she asks you to mark 11cm on top and 22cm on bottom.  Each of the marks should be 11 cm away from one another, but on the bottom, starting at the 22cm mark.)  Again, I love the youtube videos.

As I type this, my sick baby just fell asleep on my arm.  She never ever ever does this, but the snuggly spot and the repetition of the typing must have done the trick!  Keep warm and stay healthy everyone.

Saturday, January 19, 2013

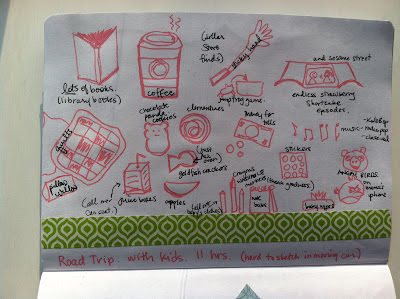
Project 14: The Sketchbook Project

This week, I scrambled at the last minute to finish my entry into The Sketchbook Project.  I hate scrambling.  I like to plan and get stuff done way ahead, but that didn't happen.

When my friend, Ladonna, called to remind me of the deadline, I tried to be zen about it and told myself, "Just do what you can before the deadline and send it in."  But I couldn't.  So on the day of the deadline, I loaded the dining table with a ton of art supplies and barely parented all day to get this thing done.  I think we got to the post office at 4:29pm.

I really enjoyed the process, and let it just all come intuitively.  Soleil loved playing along for about the first 2 hours, and then she was over it.  (Yes, I parked her in front of the tv.  Yes, I am a horrible mom.)

Here it is.


Monday, January 14, 2013

Project 13: Ruffle Apron

I made this for one of my childhood BFFs!  I love making things for other people--I try to make it nicer and learn something I wouldn't otherwise, if I were making it just for me.  I reallllly wanted a pretty ruffle on the apron, so I went to Youtube.

Here is the general idea--
1.  I traced the pattern for the skirt, and then the top piece, on newspaper, and cut the pieces out of fabric.
2.  I added ruffle and pocket.
3.  I hemmed everything.
4.  I sewed it all together, trying to make it look as finished as possible.  (This involves sewing right sides together, most times, and opening up/flipping inside out to get a nice sewn edge.)
5.  Watch LOTS of Youtube tutorials and pick the stuff that works for you best.

But I will give your specific instructions on the zipper pocket, because it was so easy!

1.  Sew in zipper to pocket fabric.  (Right side of zipper facing right side of pocket fabric.) Flip over so that you see pretty side, and sewn side is hidden from view.
2.  Place the other side (unsewn side) of zipper face down, on apron fabric.  Sew zipper in.  Fold over so that pocket looks like a pocket.
3.  Make sure you have folded the other 3 edges in about 1/4-1/2 inch, so the raw edges don't show.  Top stitch all the way around, making sure to sew over the little zipper end tails up at the beginning and end of zipper.

(I hate written word instructions... so sorry!  I prefer seeing it, rather than hearing about how to do it.   This is where youtube comes in handy.)

RUFFLE:  The best tutorial was from DIY Dish--the twin sisters who make the videos are soo adorable and easy to understand.

Project 12: "It's a Long Winter" Campsite

It is 5F/-15C here in Minneapolis.  It is definitely too cold for me to go outside with the kiddos!  
While Soleil napped (ok, not really, but I left her in her crib for mandatory "quiet time"....) 

I set up 2 tents in our family room.  
I pulled out every book that was camping, outdoor, or bug related.  
I found every compass, flashlight, telescope, lanyard thingy we had. 
I pulled out every squishy creature and all the stuffed animals.  
I pulled out the sleeping bags and all the pillow in the casa.  
The last step?  I took the kids to the library after school and came home with a bag of fresh books for each of them.  
This resulted in hours of play.  Heck, if you come over right now, it is still set up.  Tate begged to keep it up permanently.   This isn't exactly a project that you make to keep, but it was creative and fun!


Sunday, January 06, 2013

I'm Back!!

Hi All!! I am happy to report that things are good here.  I don't even feel like I have had an organ removed, aside from being a little tired.  Well, I felt good enough that last week, when the 2 year old decided that she had had enough of the nature walk, that I could carry her up the hill and all the way home.  (I couched it for the remainder of the day, but hey, I did it!)

I have been creating, which is the best part about recovery.  And cooking, of course.  Not so much on the cleaning, though.

I plan to post a few pictures of the latest projects, with no intention of "catching up" with my total of 52 projects for the year.  This is supposed to be fun, right?! I will start this week, with the hopes of doing something creative once a week.  That idea, my friends, makes me very happy :)

Also, I have discovered:
Creative bug and Craftsy.   I am addicted!  I now want to make homemade buttercream, and sew, and knit and etc etc etc after watching one of the tutorials.  I may or may not get to that right away, but I really was inspired by these online workshops.